Early exploration should teach the map, not punish curiosity. Learn
the warning signs that a route is too deep, too dark, too noisy, or
too far from a clean oxygen return.
BiomesThreat avoidanceSupports safer routes
Last reviewed August 31, 2026Patch sensitivity High
Dangerous zone guidance can change quickly if biome layouts,
creature behavior, or depth pacing are adjusted.
Quick answer
Avoid early zones that combine poor visibility, unfamiliar
creature audio, deep travel, and unclear return landmarks. If
two of those warning signs appear at once, turn back and
return after oxygen, storage, or route knowledge improves.
August 31 structure update
Fastest read: leave when darkness, creature pressure, and weak return landmarks stack.
Best scout: take one edge peek, bank one clue, then stop before the route turns greedy.
Dangerous zones usually announce themselves before the run
collapses. Watch for darker water, tighter terrain, louder
creature pressure, and weak return landmarks.
Low visibility is a stop sign.
If landmarks disappear before the goal is clear, bank progress instead of forcing a deeper route.
Unknown creature pressure changes the plan.
When the route becomes reactive, come back with better oxygen, a safer angle, or a clearer target.
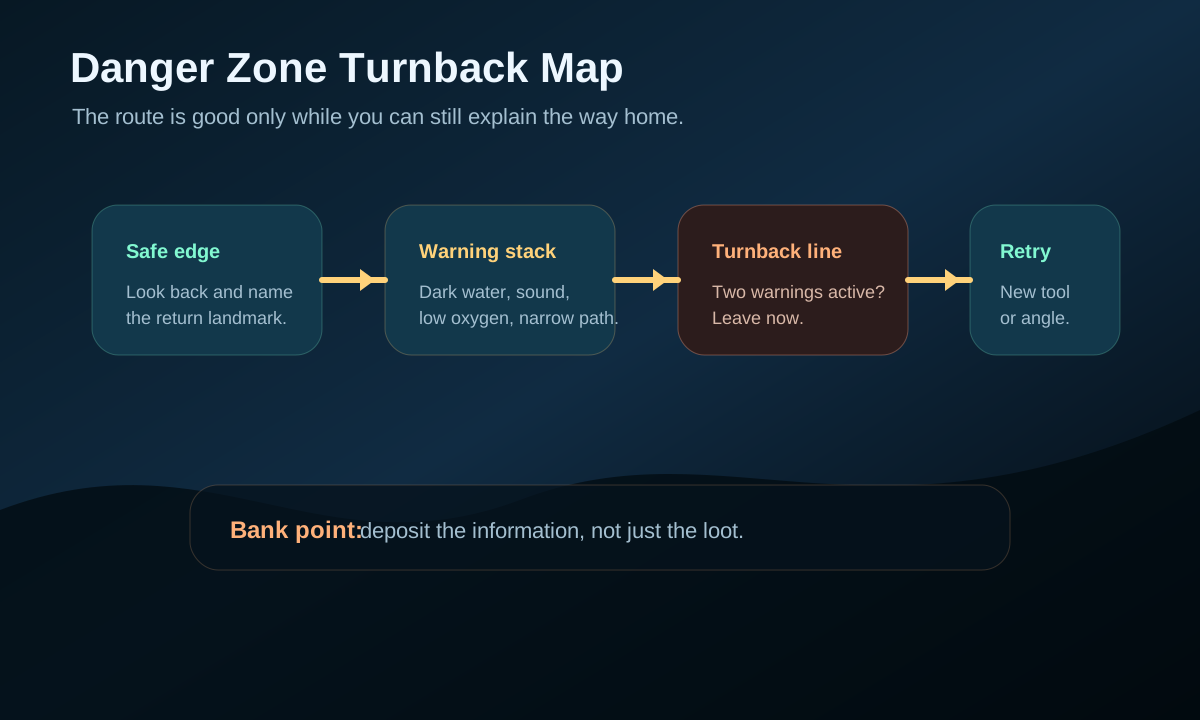
Retreat checklist
If two or more of these are true, the route is probably ready to
bank and leave.
Do not treat retreat as failure. A clean turnback banks the landmark, warning sign, and next prep need for a better return.
Danger signal table
Dangerous routes are usually a stack of small warnings. Use this
table to decide when curiosity should become a retreat.
Warning sign
What it means
Safe response
Return later with
Darker water
Landmarks and return paths get harder to read.
Stop at the edge and look back.
Better oxygen and a known route marker.
Louder creature audio
Threat pressure may change the route suddenly.
Leave before scanning or gathering deeper.
Safer angle, vehicle support, or a clear goal.
Narrow terrain
Escape paths become less flexible.
Do not enter with a full inventory.
Storage, oxygen, and a planned exit.
Low return margin
One mistake can turn the trip into a rescue.
Bank progress immediately.
Oxygen upgrades or a shorter approach.
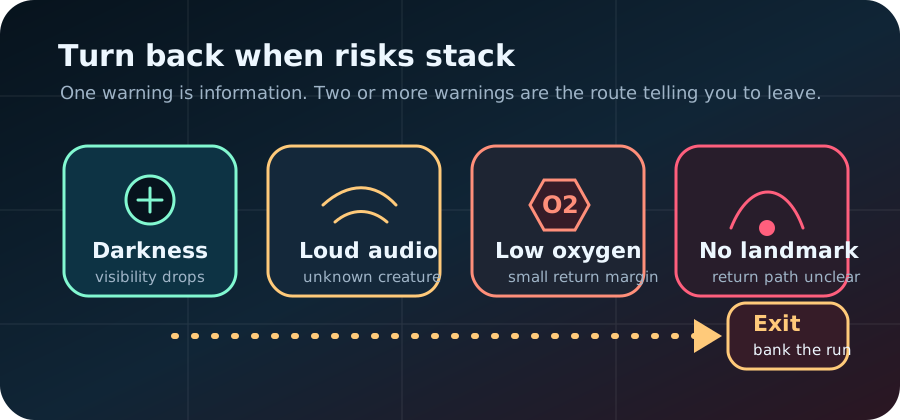
Danger stack visual
A zone is rarely dangerous for one reason. The real warning is
when darkness, creature audio, oxygen pressure, and weak
landmarks start appearing together.
If two warning signs are active at once, leave with the information you gained instead of risking the whole run.
Warning signs to respect
The route gets darker before you have a reliable return landmark.
Creature sounds become louder while your oxygen margin is already low.
The terrain narrows and makes quick escape paths harder to read.
You keep seeing useful materials but cannot explain how to get home safely.
How to turn back without losing progress
Stop chasing one more scan or material once the route becomes unclear.
Swim back to the last landmark you fully recognized.
Deposit materials, upgrade survival tools, then re-enter from a safer angle.
Use the failed route as information: note the warning sign that ended the trip.
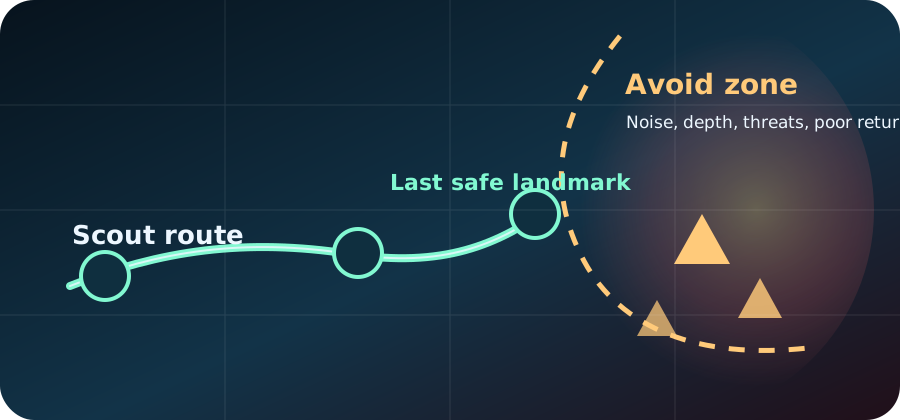
Danger-edge scout rule before a real commitment
A dangerous zone can still be useful before it becomes a real
route. The goal of the first scout is not loot. It is learning
one warning sign, one safe edge, and one exit cue you can trust
later.
Scout result
What it means
Next move
You found a readable edge and one clear retreat line.
The zone can be studied safely without full commitment.
Repeat the edge once before collecting deeper value.
You met stacked darkness, threat, and oxygen pressure early.
The zone is currently teaching survival cost, not route value.
Leave and fix the support layer that failed first.
You saw the target but not the return.
The route is still incomplete.
Scout for landmarks or a safer entry instead of taking the bait.
You returned with one useful warning clue.
The scout was already successful.
Record the cue and stop before turning scouting into greed.
Bank what the danger taught you
A dangerous zone becomes useful when you return with a named
clue, not when you barely survive and forget why it went wrong.
What ended the route
Information to keep
Next prep
Do not return for
Landmarks vanished
The last reliable edge, color shift, or terrain shape.
Shorter scout path and a clearer exit marker.
Random materials beyond the visible edge.
Creature pressure rose
The sound cue, depth change, and first safe retreat point.
Safer angle or better oxygen margin.
A scan that requires crossing the patrol path.
Inventory got too valuable
Which material made the run worth banking.
Drop-off first, then a single-goal return.
One more pickup after the objective is complete.
Oxygen margin collapsed
The point where the return stopped feeling boring.
Upgrade oxygen or cut the goal in half.
Deep curiosity with no named reward.
August 31 update: turn a failed danger route into a safer second attempt.
A failed danger route is only wasted if the next attempt repeats
the same mistake. Use this table after a bad trip to decide
whether to shorten, delay, or reroute before returning.
Failure pattern
What it proves
Second-attempt rule
Best support guide
You reached the edge, then lost the way home.
The route needs better landmarks before it needs more bravery.
Repeat only to the last readable anchor and stop there twice.
The safest early answer is often a half-route: touch the edge,
identify the warning, then go home before the route asks for a
rescue. This gives the next attempt better information without
risking the whole inventory.
Scout step
What to do
Success looks like
Leave immediately if
Set the edge
Stop at the last bright, readable landmark before the biome turns darker or tighter.
You can point back to the route home without guessing.
The old landmark already disappeared behind terrain or color shift.
Peek once
Move in only far enough to identify one material, creature cue, or depth change.
You learn one useful fact and still have an easy retreat.
The route needs a second unknown turn before showing a reward.
Bank the clue
Return home, deposit, and write the next prep need in your plan.
The next attempt has a named goal and a stronger return rule.
You are only returning because the zone looked exciting.
Update the route after a failed danger check
A normal guide site should not only say "avoid danger." It
should teach what to change after the danger appears. Use this
mini review before repeating the same risky swim.
Write the real failure: landmark loss,
creature pressure, oxygen margin, narrow terrain, or unclear
reward.
Change one variable: shorter approach, safer
angle, more oxygen, empty inventory, or a clearer scan target.
Repeat only the edge: do not push deeper until
the first failure no longer controls the route.
How to make a dangerous zone useful without committing
You do not have to clear a dangerous zone for the visit to be a
success. A short edge check can still produce useful progress:
one landmark, one safe approach angle, one resource clue, or
one reason to delay the route. That information is safer to
bank than a rushed deep push with a full inventory.
Treat the first visit as reconnaissance. If the area stacks
darkness, narrow terrain, unfamiliar sounds, and weak oxygen,
leave before collecting anything expensive. Return only when
the next trip has a named objective and the previous failure
has been solved by better prep, not by optimism.
August 31 maintenance note
This page stays most useful when it tells you exactly what to
do after the warning stack appears. Recheck it after biome or
creature changes, then confirm the same turn-back cue still
works.
Danger route traffic-light rule
Use this rule during the swim, not after the route has already
gone wrong. The aim is to turn scary areas into controlled scouts
that produce information without losing supplies.
A high-value safety guide should explain what to do after the
mistake. Use this small review after any failed route so the next
attempt changes something concrete.
Name the first failure: landmark loss, oxygen shortage, creature pressure, cramped exit, or unclear reward.
Choose one fix: shorter edge scout, clearer landmark, extra oxygen margin, empty inventory, or a safer approach angle.
Repeat only to the old failure point: do not push deeper until the same signal no longer controls the route.
Update the next page: if the failure is creature behavior, use threat guidance; if it is route shape, use map and landmark pages.